At last weekend's knitting machine seminar in Monroe, I picked up some old magazines that were offered for "donation".
These old magazines contain a wealth of information from the heyday of machine knitting back in the 1970's through the 1990's. Even though the styling is dated, the techniques used can be applied today.
For example, Machine Knit America Vol 2 from Fall of 1992 contained a short article about a "plaid" fairisle pattern designed by Barbara Pavack, owner of the Knitting Hide-a-way in Issaquah, WA. I checked, the shop is not listed online currently. The technique involved alternating rows of blocks of color with rows containing 'striped stripes'. Think of the checks on a gingham fabric and perhaps you can visualize.
Here is the general idea of the repeat:
!!!!!!!!!!!!!!!!!!!!!!!!!
!!!!!!!!!!!!!!!!!!!!!!!!!
------------XXXXXX
------------XXXXXX
------------XXXXXX
Her article mentioned that with this pattern, there are endless variations of this stitch pattern that could be used for design possibilities, including color changes, alternating the rows with different colors, using a bulky instead of a standard gauge machine, using the "reverse" button on an electronic machine. I suppose you could use the double length buttons as well for a different look.
Barbara mentions that her design was adapted from a purchased man's sweater. Each new variation, in essence, is a new design.
There was an accompanying coat design in a turquoise, shades of gray, and pink color. Even though I would not make the exact shape of the garment today, I would definitely consider making the sweater in a different colorway, with a shorter length. This would make it a cardigan rather than a coat jacket. The length of the design was 33.5 - 34.5. I would cut about 6 or seven inches off that. Then the shoulder was a modified drop and the accompanying photo looked as if shoulder pads might have been inserted. They did that back in the 80's and 90's! I would set the shoulder in slightly more, which would mean removing a few rows from the sleeve and adding those rows back to the sleeve head area. In addition the pattern called for a cording trim which I would probably omit. The yarn called for in the original design was Bramwell Roseknit. Checking Ravelry, I can find out that it is a fingering superwash 100% wool put up on cones.
So, in summary, modify the plaid stitch pattern to suit my taste, modify the schematic to match a more current silhouette and my shape, choose different colors and a currently available yarn, make a gauge swatch to apply the measurements and convert to stitches and rows, and I'll be done! I will have designed a "derivative" design through inspiration from Barbara Pavack. (Oops, forgot about the knitting, finishing, blocking, and sewing up!)
Or alternatively, design the stitch pattern in Design-A-Knit, apply it to one of my existing garment shapes, make the gauge swatch, recalculate, and away we go!

Monday, July 27, 2015
Sunday, July 26, 2015
New-to-me machines
I have been busy rescuing machines from the landfill. Not literally, but I have bought several who might have otherwise gone there recently!
I am now the proud owner of a Superba, a Passap, a BEST, an 8-button Brother, a Toyota, and a Singer. These were in an estate sale and none included manuals.
I also purchased a Home Profit circular sock machine a few months ago.
Before that I found a deal on a Brother portable machine with a folding, plastic bed. Lightweight but standard size machine. Only manual patterning.
I will be very busy learning the features of these machines. I won an e-Bay auction for the hardcopy Pattern Book for the 8-button machine, it arrived well-loved and I am happy to have it.
I hope to feature each of the machines in upcoming blog posts.
Inspired
I came back from the 27th annual Monroe Machine Knitting seminar charged up and ready to finish my sweater! (too bad I did not get it finished in time to show it off!)
Here is a sneak peak at the yarn:

Here is a sneak peak at the yarn:

There are two strands of about a 2/24 acrylic. I purchased this yarn in a plastic bag labeled Mill Ends. I should know better. I got the first half of the sweater knitted when I realized that half the bag was balls with two strands, and the other half of the bag was balls of 1-strand yarn.
So today, in addition to the crochet cast-on and the 128 rows of stockinette I completed, I also wound four balls, first re-winding the ball into a cake, and from there, winding the two cakes into a larger cake. I only hope the gauge does not vary too much from ball to ball.
I was having trouble with loops on left side of carriage. I am guessing it is because I am using the full bed and the end needles which I normally do not get much use from. Probably I am not pushing evenly across the bed. So I got to practice the technique of "fast ripping" that was demonstrated at the seminar!
There were three sessions each day (Friday and Saturday) with four demonstrators at Monroe, Michigan this year: Kathryn Doubrley (The Answer lady), Diana Sullivan from Austin. Texas, and a new pair of teachers from New York State, Barb Endler and Susan Adams. I was blessed to see many new-to-me techniques demonstrated, as well as tried-and-true ones. Truly I was blown away by Diana Sullivan's lace scarves, which she demonstrated. She was kind enough to include instructions for one in the seminar handout. Susan's explanation of WHY the knitting machine patterns the way it does was also helpful in inspiring future experimenting.
Thanks once again to Cathy Reaume and all of her helpers for organizing this. It is wonderful to have the opportunity to attend seminars in-state.
Several of us from Northern Macomb, St. Clair, and Northern Oakland counties were talking about organizing a meet-up for later in the fall. Maybe October?
Saturday, February 7, 2015
Newest TKGA Master Machine Knitter Level 1
I submitted my package for level 1 Master Machine Knitter, and yesterday I received it back. I am thrilled to report that I passed and I did not have to re-submit anything! The judge, Uyvonne Bigham, sent along a personal note that mentioned some of our mutual acquaintances in Missouri and Grand Rapids.
She was so nice, and very complimentary on the evaluation. Succeeding on this project really makes me feel motivated to start knitting more. There is nothing like positive feedback to build you up and make you happy and ready to change the world.
She even took the time to knit a swatch to illustrate the one criticism she had of my work, which was that I was not hanging the marker stitches for some of my swatches properly. (I did not mention to her that on one of my swatches I actually FORGOT to hang the stitch markers and so I inserted them after the fact. So, now I am telling the world!)
Here is the hat I submitted:

 Additional techniques can be used to create a larger garment. Turning the garment sideways when knitting is often successful for plus sizes because the number of rows is not limited.
Elizabeth Zimmerman, although a hand-knitter, published a mitered design called "Surprise Jacket" that was translated for machine knitting by Susanna Lewis and published in the short-lived but visually stunning MacKnit magazine. I think there is also a similar "origami" jacket in one of the books on my shelf - Is it Kathleen Kinder's book or Susanna Lewis? Time to do some research, I guess.
She was so nice, and very complimentary on the evaluation. Succeeding on this project really makes me feel motivated to start knitting more. There is nothing like positive feedback to build you up and make you happy and ready to change the world.
She even took the time to knit a swatch to illustrate the one criticism she had of my work, which was that I was not hanging the marker stitches for some of my swatches properly. (I did not mention to her that on one of my swatches I actually FORGOT to hang the stitch markers and so I inserted them after the fact. So, now I am telling the world!)
Here is the hat I submitted:
I'm working on designing a sweater in Garment Designer using a similar yarn that I had spun by Zeilingers from same fleeces, it is DK yarn weight and I am using the bulky machine at tension 5. I knitted a swatch for it and did not make it so neat and tidy as the work I did for submission, since I am making the swatch simply for measuring the gauge.
All three sections of this swatch are 40 stitches by 40 rows. First is stockinette, and I am using the 1x1 punchcard on tuck stitch for the 2nd and 3rd sections. The middle section is using the tuck stitch at normal setting, and the section on the right was made using the same punchcard at a double-high setting. I can get more width from the fabric on this setting, even though the fabric is bulkier.
Notice on these swatches, instead of hanging a stitch marker, I left a needle out of work, as I learned when I first started machine knitting.
When designing for a plus-size person, you must remember that it takes a little more design effort to plan ahead for having the garment sections fit on the available needles of the machine. There are several ways to accomplish this, and one is to use tuck stitch or slip stitch or a woven design to make the fabric using standard 4 pieces of a sweater, front and back plus 2 sleeves. All of these techniques result in a larger gauge, with fewer stitches per inch in the resulting fabric. This means that you can achieve a wider fabric with fewer needles.
Another way to accomplish the end goal of have a garment that fits, is to make more garment pieces. One example is making a cardigan with seam in the back (4 body pieces plus two sleeves) or using a centered or underarm panel to obtain more width. (6 body pieces plus two sleeves)
Using a fairisle, cable, or other decorative technique to make the additional panel stand out means that the resulting gauge will be different for the panel. In this case, the seaming using mattress stitch will not be quite so easy as if you were to have the same number of stitches on each panel.
The more pattern pieces, the more sewing together must be done. Sometimes I use a sew-as-you go technique to join the pieces together as they are knitted. A linker or sewing machine may also be used.
Elizabeth Zimmerman, although a hand-knitter, published a mitered design called "Surprise Jacket" that was translated for machine knitting by Susanna Lewis and published in the short-lived but visually stunning MacKnit magazine. I think there is also a similar "origami" jacket in one of the books on my shelf - Is it Kathleen Kinder's book or Susanna Lewis? Time to do some research, I guess.
Saturday, January 3, 2015
Conquering my fears
I was having trouble moving the carriage on one of the KH 930s yesterday while trying to make lace for the first time since 1994.
So I first checked the carriage, and there was some yarn wrapped around the brushes. Removed it. Decided to replace the brushes with the extras I had purchased for this purpose. When I removed the brushes to replace them, I found additional yarn wrapped in a tight little circle around the spindle. Replaced the brushes. Checked the rotation - one of the brushes would not move easily.
I just knew I had replaced everything just the way I found it, so I was confused. I went into a Zen-like trance of observation and noticed that one of the little wheels (daisy-like piece of plastic) was concave, and the other was convex. I don't remember removing that wheel, but OK, flipped the one on the side where the brush did not move easily, and replaced the brush again. Now the brush is moving easily.
Replaced the carriage on the bed of the machine and observed I was still having trouble moving the carriage when patterning. I once again entered into the trance. I realized that the belt was buckling when I tried to move it manually by inserting a tool into a slot in the belt.
I replaced the carriage and had a moment of panic when I realized the machine did not pattern now. What did I do? I powered off the machine and pulled the plug, waited 5 seconds, and plugged back in. (I had no specific reason to believe this would work, except that sometimes my computer needs this treatment...)
Thinking perhaps there was some issue with the needles, I removed the sponge bar. Pulled every needle to hold position and replaced it. Then replaced the sponge bar. No change.
My husband, who always likes to take things apart and put things back together, suggested that perhaps I needed to remove the cover.
I didn't want to do it, but I wanted the machine to work again, so I did it. First the right side, then realized I would need to remove the left side as well to get an unobstructed view. After both sides were removed there was one more cover that needed to come off in order to see the mechanism. He said that the black plastic encoder wheel was turning fine but the spindle was not. Either a bearing has failed or maybe it just needs lubrication, he said. So I added some of the machine oil at the point below and at the other end.
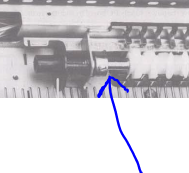
After replacing and reassembling everything, I worked the carriage back and forth, with much improved operation. The machine is about 30 years old, and that has never needed lubrication until now. I wonder what else needs to be cleaned and lubricated?
So I first checked the carriage, and there was some yarn wrapped around the brushes. Removed it. Decided to replace the brushes with the extras I had purchased for this purpose. When I removed the brushes to replace them, I found additional yarn wrapped in a tight little circle around the spindle. Replaced the brushes. Checked the rotation - one of the brushes would not move easily.
I just knew I had replaced everything just the way I found it, so I was confused. I went into a Zen-like trance of observation and noticed that one of the little wheels (daisy-like piece of plastic) was concave, and the other was convex. I don't remember removing that wheel, but OK, flipped the one on the side where the brush did not move easily, and replaced the brush again. Now the brush is moving easily.
Replaced the carriage on the bed of the machine and observed I was still having trouble moving the carriage when patterning. I once again entered into the trance. I realized that the belt was buckling when I tried to move it manually by inserting a tool into a slot in the belt.
I replaced the carriage and had a moment of panic when I realized the machine did not pattern now. What did I do? I powered off the machine and pulled the plug, waited 5 seconds, and plugged back in. (I had no specific reason to believe this would work, except that sometimes my computer needs this treatment...)
Thinking perhaps there was some issue with the needles, I removed the sponge bar. Pulled every needle to hold position and replaced it. Then replaced the sponge bar. No change.
My husband, who always likes to take things apart and put things back together, suggested that perhaps I needed to remove the cover.
I didn't want to do it, but I wanted the machine to work again, so I did it. First the right side, then realized I would need to remove the left side as well to get an unobstructed view. After both sides were removed there was one more cover that needed to come off in order to see the mechanism. He said that the black plastic encoder wheel was turning fine but the spindle was not. Either a bearing has failed or maybe it just needs lubrication, he said. So I added some of the machine oil at the point below and at the other end.
After replacing and reassembling everything, I worked the carriage back and forth, with much improved operation. The machine is about 30 years old, and that has never needed lubrication until now. I wonder what else needs to be cleaned and lubricated?
Stash inventory
I decided I would be more productive knitting if I knew where my yarns were and what I had, instead of spending time searching for the right yarn for each project.
I had several plastic bins with coned yarn under the basement stairs. Plastic to keep any unexpected flooding out, and under the stairs to keep the yarn away from light sources to prevent fading. In order to find a particular cone of yarn, I had to move each bin, take the lid off, look inside, and then if the yarn was not in that bin, move the bin again to allow me to look in the next bin. Even though the bins are translucent plastic, I find that I am not always able to determine what is inside by looking through the lid, especially if the lid is covered by another bin.
I found a great shelf unit on Amazon.com - it has the right size between shelves to allow the plastic bins to slide in. Each shelf unit holds 8 bins.
I did not realize until I started this project that, with recent acquisitions, I now had more than 24 bins (some with fabric, not all yarn) until I started stacking the bins on the three shelving units. No wonder I was having trouble finding the yarn I wanted! For the present, I am going to limit myself to 24 bins for yarn. I won't buy any more yarn until I use some of the yarn I already have, to make space.
Fabric will have to be addressed at a later date.
I labeled each bin with a 2-digit code - a letter to indicate which shelving unit, and a number between 1-8 to indicate which spot the bin occupies on the shelving unit.
Next, I started the inventory. The first night I tackled two bins. For each cone of yarn, I take a picture and upload to Ravelry's "stash" tool. Ravelry has fields for yarn colorway and color category, weight, name, manufacturer, date purchased, dye lot, cost, and a field for text entry of comments. Easy, because each bin had about 5 cones. Last night I completed the third bin.
I found some yarn in last night's bin that will be suitable for my final project for TKGA's Knitting Machine Master's program, Level 1. My primary mission is accomplished! But I still want to continue the inventory project.
I think I now can appreciate the acronym STABLE - STash Acccumulation Beyond Life Expectancy.
Subscribe to:
Posts (Atom)