. brightmeadowknits: May 2018

Wednesday, May 30, 2018

Short-sleeved kimono (Part 2)

I have been planning how to knit this kimono.   I think it will work best if I start at the lower left garment side (we are looking at the pattern as it hangs on the knitting machine, meaning the wrong side is facing up). 

Starting at the point I have labeled  "2" in the diagram below is the default approach in the Garment Designer instructions, but that will result in having to cast on a large number of stitches at the underarm seam.  It will also mean knitting non-continuous pieces.   It means that the increases for the angled pieces will result in a jagged seaming edge.  I prefer to seam along one-stitch knitted edge.  So I am going start instead at the point I have labelled "1" in order to short-row to achieve my smooth seam.  I'll start with the angled side and leave it hanging on the needles until I reach the same row with my sleeve. 

 I have set the zero points (origin points) at the bottom left (for rows) and the middle (for stitches). The diagram (see the red line marked "1") tells me at I will have 100 stitches at the point of a straight line (red line), between the center (0) needle and the right side (100) needle.    I cast on with waste yarn and knit several  rows, before I knit my seaming row. 

I am knitting the wedge marked "1" first, then moving to the wedge marked "2" and continuing up the sleeve. When I reach the underarm, I will knit the two pieces together as one row and continue knitting as normal.


 Garment Designer is uniquely visual in the way it prints the instructions.  You work from the bottom of the instructions up, the same way you knit your garment from the bottom to the top.  The software does the math, but it assumes I started at row 0.  Instead, I wanted to start at Row 44!  For now, I am ignoring rows 0-43.  Since I am short-rowing, instead of increasing I am putting stitches in work.  Refer to the instructions in the screen shot below in box labelled "1".  Note that the labelling is consistent from the diagram to the shaping instructions, "1" instructions refer to the wedge-shaped piece marked "1" in the diagram.

 I knit the first complete row (row 43), my seaming row, using all 100 stitches to the right of 0.  So for my first short row (per the chart,  row 44) I will pull 7 at the right stitches to working position.  Carriage is travelling left to right.   I had previously set the method of shaping in GD to shape only on alternate rows, but not strictly.  This means I can always shape on the side away from the carriage, knitting the complete row, wrapping, and returning without shaping. The second row (row 45), I pull 7 adjacent stitches to working position and knit back (row 46 has no shaping on this part, shown in box 1 below.) Row 47 I am knitting 15 additional stitches and wrapping, row 48 has no shaping.  Row 49, I pull 14 stitches back to working position. I continue on following the chart.

 Garment Designer is very visual, as I noted.  It is expecting me to be casting on these additional stitches when working from bottom to top.  It shows the increases on the left side of the section.  Because I am short-rowing and not increasing, I am working on the right side instead of the left side.  It is an adjustment I made to achieve the result I wanted.  To keep track of where I am, I started my row counter at 43 because that correlates to the lines in the instructions.  Notice that rows 50 and 56 have no shaping instructions inside box labelled "1", the shaping for those rows is on the left side of the bed, which does not even have any needles in work at this point.  When I reach row 57, I put the last 11 needles in work.


So, I have come to the end of my "wedge" that I created in box 1.  When all the needles on the right of 0 are in work, and will remain in hold while I continue knitting the sleeve, or left side of the piece as I face it, there is a potential that the carriage will cause abrasion of the yarn while travelling back and forth.  See my post from November 2017 for an illustration of this problem. 
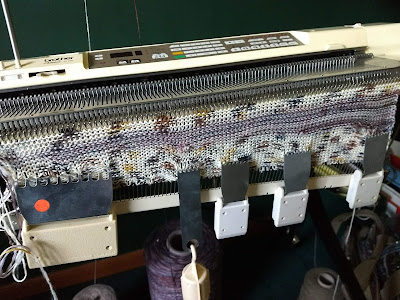
 So I am knitting several rows of  waste yarn to take any abrasion that might occur.  The next step is to put all these needles in hold position until I am ready for them, and when I reach row 58 and it is time to join the 2 pieces I will "frog" or unknit the rows of waste yarn and return my garment yarn to the needles.  Note also that my weights are hanging from the waste yarn I used to cast on, not from my garment yarn.  The weights can distort stitches, but the waste yarn smooths out the uneven tension. 

In the meantime, I will knit the sleeve, reversing the logic used above to reverse the slope of the wedge piece.  I dreamed (literally) last night that I should use a crochet row on the right side of the garment to reinforce the edges of the sleeves.  I dreamed of doing 3 rows of crochet, every other row, but realized on waking up that could cause issues due to the short-rowing.  So I'll just use one row to give a firm edge.  

I thought you might get a laugh from seeing the "industrial-size" cone of variegated rayon yarn I am using for this project.  The yarn on the left is a normal-sized cone of Tamm Varsity that I won as a door prize at Spring Fling.   There is literally no chance I will run out of yarn.  Part of my dream last night involved making an entire wardrobe from these yarns.   


Sunday, May 27, 2018

Down the Rabbit Hole

I went down the rabbit hole this weekend, but at least I didn't come home with any Angora rabbits!  I visited the Great Lakes Fiber Festival in Wooster, Ohio.  It was kind of an expensive weekend, as the Ohio State Highway Patrol kindly reminded me on the Lincoln Highway that Ohio is a little more serious about going slow and paying attention to speed limits than the Michigan State Police are.    This happened after I visited the Fiber Festival.  I tried to play on the trooper's sympathy by telling him I had been at the Fiber Festival, after all, I am a grandmotherly type, wearing my hair in a bun - a little old lady in tennis shoes.  He didn't care.  He gave me a driving award.

As I drove up, I heard the sound of an auctioneer.  I believe the sheep were being auctioned off.  This fiber fest is a livestock event as well as a spinner's and knitter's paradise.

I saw a few people I knew. A fellow machine knitter from Youngstown, Ohio; and my "Fiber Arts and Social Media" instructor from the Michigan Fiber Festival last year.  I visited all the vendors, but knew Carol Larsen (dyer)  and Candy Haenzel (Angora Rabbits).  I walked around. taking it all in,  until I could hardly walk any more.
A view down the aisle of one of the vendor buildings.

I bought a few things:  A colorful basket from Ghana, a Celtic shawl pin, and some wool yarn for my students at Fiber Fest in Allegan.  I wanted to buy a lot more things but I managed to restrain myself.

Copyright 2018 Brightmeadow Knits
I've been thinking about the sweater I am designing.  Earlier this weekend I visited JoAnn Fabrics and took a look at the Marcy Tilton Vogue pattern I am basing my design on.  JoAnn has Vogue patterns on sale on June 1 for about $5.00, so I will purchase it then.  I am really curious about the approach the designer took with the lower back panel.

In the meantime, I've been working on another design that is quite a bit simpler. At right is my rough sketch of how I envision it will look. Please note: I have no formal training in fashion illustration!

Instead of the 10 pattern pieces needed for the other sweater, this new design will have only 3 panels.  It is a kimono.  I am making a short-length sleeve version, which will hit at about the elbow.  The sleeves are combined with the fronts and back, and I will be knitting it sideways.
Garment Designer Pattern Pieces


  While I was at JoAnn's I purchased some lightweight striped knit fabric, to make a "muslin". (Color choices were somewhat limited!)  A muslin is another word for a test garment.  I created the pattern in Cochenille's Garment Designer.  I displayed the pattern full size, and printed it out, and taped the individual pages together to make the full-size garment pattern.  Then I cut out the pieces for the test garment, and sewed them together at shoulders and sides using the serger.  I was a little concerned about the test garment edges fraying, so I stabilized them by turning the hem up over a 1/2 bias tape, and used a cover stitch machine to fasten it down.  The dart didn't seem like it would take up much fabric, so I eliminated it for now.  I may decide later it is a good design line and stitch it in with a standard sewing machine.

Then I tried it on.
 I think it fits pretty well, although I did not achieve the diagonal line in front that I had hoped. The diagonal wants to hang at the neck instead of the hem.   I may adjust the pattern to bring the center front up another inch or two.  I didn't use any fasteners on this test garment, so before I make changes to the pattern I will play with using a shawl pin on the outside and a hook and eye on the inside to bring the neckline edge a little further up. Perhaps I need another inch or so of ease in the hip to make that work.  Also I think the lower sleeve is a little loose, but then, that is the style of a kimono.  I may adjust slightly.  I stayed up until 2:00 am pinning and stitching the edges down.  Test garments are supposed to be quick and easy!


Here's my swatch for the machine-knitted  garment:  It is from a cone of Tamm Varsity variegated  I won as door prize in Spring Fling, carried along with a cone of a variegated industrial rayon I won a few years ago as a door prize in Monroe.  I love the way the shades of the two colors play against each other. The swatch fabric is quite a bit heavier than the test garment fabric, so that may make a difference in the hang of the garment.   In order to knit this garment in this yarn combination, as swatched, on a standard gauge machine, I need 197 needles at the widest part.  To knit in another yarn, I have to achieve less than 6.6 stitches per inch gauge on the standard bed of 200 needles. Using either of these yarns alone does not yield the necessary stitch width, but together they are perfect.

Corrected 5/29/2018, the garment is the short-sleeve version.


Wednesday, May 23, 2018

Picot Edges

In my Machine Knitting 101 class last weekend, one of the students asked a question about my instructions for the picot edge. 

A picot edge is created when the turning row for the hem has eyelets worked in it. When the hem is turned, the stitches between the eyelets magically turn into little points or "picots", to use the French term. 

This finish can be accomplished by transferring every other stitch on the turning row to the adjacent needle manually.  If you have a lace carriage, you can pull forward and select every other needle, then transfer all stitches to the next needle using one pass of the lace carriage.

My instructions said to set the tension DOWN one full number for the turning edge.  My student was surprised, because on a hung hem, normally you turn the tension UP one full number to allow the edge to turn.


My reason for tightening the tension is that the eyelets or holes formed by the picots allow the necessary slack for turning. This replaces the looser tension of the turning row on a plain hem.  By tightening the tension, you get sharper picots.  To demonstrate this principle, I made some swatches on the standard gauge machine.
Unblocked

  The photo above shows unblocked examples.  The one on the left is made with the tension turned up one notch to a higher tension.  The middle sample shows a picot edge using main garment tension.  The final sample, on the right, shows a "graded" tension.  The main tension was 5.  Five rows of the hem were knitted and tension reduced to 4.  Five more rows were knitted and tension reduced to 3. Five rows were knitted, the picots were formed, five rows were knitted at T3, then the tension was graded back up one full number at a time.  The illustration below shows the same swatches after a light steam blocking and with the yarn ends woven in. 
Steam Blocked

 The turning row for the hem is much softer and rounded when stitch size is increased for the turning row.  The graded tension provides much better stitch definition, and it also has the benefit of reducing any flare in the hem over the width of the complete garment.

I notice that on the first sample the hemline is not as defined on the other two. The reason is that I accidentally made a row of picots too soon.  When hanging the hem, I picked up only the stich on the top of the eyelet on the back side (first row of the hem) and did not try to pick up every stitch.   On the other two samples, I picked up every stitch, and did not increase the tension on the hanging row.   On a real garment, I would take care to soften the hemline as in the first sample by hanging only every other stitch and by increasing the tension slightly on the row knitting the two stitches off the needles. 

The difference between the three samples is subtle to the eye.  You may focus on the shadow below the samples to be better able to differentiate the sharpness of the picot.  Better yet, sit down at your machine and make some samples to prove it to yourself. 

Thursday, May 17, 2018

Waterfall vests and cardigans and other shenanigans

Have you noticed the proliferation of "waterfall" cardigans lately?  Some are extremely exaggerated, and some merely seem to be a "mistake" (according to traditional dressmaking rules) of an exaggerated straight hem on an A-line garment.  I myself have a Nic and Zoe sweater whose exaggerated extensions fall nearly to my ankles.  There is a lot of extra fabric in it, on these side "wings".  I actually like the overall length of this garment but think the extensions with exposed non-functional zippers are a little silly, if trendy.  The zippers do add a nice diagonal line, which is always desirable for those of us in the "round" category.

After taking Susan Lazear's class on designing from an existing garment or from an illustration at Spring Fling, in Peru Indiana, I was inspired. She recommends using Garment Designer to copy the garment based on the garment measurements, or estimating the garment measurements by analyzing the proportions against your body type.  For example, if an illustrated garment is fingertip-length, you can find the length measurement by finding another garment in your closet that is fingertip-length and measuring it.


For the last several weeks,  I've been adding to the collection of pictures of garments that I think are  My Style on Pinterest.  I noticed that the favorite garments in my closet are cardigans with shawl collars that have a lot of fabric on the front, enough to close the garment with a shawl pin or brooch if I want to, or to leave open.  Some of these are "waterfall" cardigans, but some, like the Karen Scott one at the left, which I adore, are not. At least according to my definition of waterfall!  Traditional cardigans without the shawl collar tend to fall open around my bust while wearing them, drawing attention to my extra curviness, and not being flattering.

So I was looking for, and collecting, garments that met that specification on many different plus-size websites.  I came across many articles on style for over-50 and plus-size women, and I also found many different recipes for dressing different shapes.  I am an "apple" shape, and I was pleased to find that several of them recommend my favorite garment shape for my body type.

Garment characteristics that are flattering to an Apple shape:
  • V-neck 
  • Diagonal lines
  • A-line 
  • Garment that skims the body, not hugging it
  • Asymmetrical shapes
  • 1/3 to 2/3 proportions or Golden Mean relationship to other pieces of the outfit or garment colors

One garment in particular was very exciting to me.  The pattern is Marcy Tilton's Vogue 9322.  I may have been drawn to it by the lime-green color of the sample garment.

Aside: I had my colors done a few years ago, and was surprised to learn I am a "warm spring".  All the blacks and reds and blues and greys in my existing work wardrobe were draining the energy from me, both visually and mentally! I've since drifted toward a brighter secondary color palette and notice that I have more energy.

Back to designing for knitting: The garment is a vest, with an extended collar. It has an A-line shape, and princess seaming.  At first glance, the side pieces appeared to be made from one piece, front and back together in the pattern company flat drawing.  However, upon zooming in and examining the lime green version photo, I can see a seam under the model's arm.  This is better because it means smaller pieces to be knitted on the machine. This can be a problem for plus sizes.  Just grading a pattern up, with certain yarns, may require more than 200 needles.    It has pockets that extend beyond the hemline of the garment.  Even though the original is a vest, I plan to knit it as a long-sleeved sweater.

The upper back is an inverted triangle ending at the waistline.  This means the garment lines from the back resemble an "X", tricking the eye into seeing a classic hourglass shape.  Unfortunately, the sizes are pattern-company sizes, not ready-to-wear sizes, meaning that the largest size is for bust 48 inches.  So if I were to purchase the pattern, I would have to alter it anyway.

It will be a challenge to create the pattern pieces on Garment Designer.  I've started, here is what I have so far.
  Since Garment Designer expects you to knit the entire front of the garment as one piece, even if it is a princess style, I will need to figure out how to knit the pieces separately.  It doesn't directly download to the knitting machine.  I will need to work out how to separate the pattern pieces.  This might involve printing a paper version of the pattern, cutting it apart, and then using the Knit Leader attachment for a KH-930.  Or possibly transferring it into Design-A-Knit and knitting on the KH-970, although I have not explored the transfer method yet.  Another alternative might be to transfer the graphics as a pixel-per-stitch graphic into AYAB and knit on the KH-910.    The piece at the right is the "waterfall" back extension.  Notice on the original how that extension forms a ruffle or slight peplum (or maybe a bustle?)  at the back.   I think the original is possibly rectangular, but I wanted a little less waterfall and a little longer coverage.

The collar may also need to be separated, because I may want to design it using a different stitch pattern so that there is interest on both the right and wrong sides of the fabric, since it is turned back.

I also need to think about the stitch pattern I will use for the garment and the finishing of the edges.  My current pattern has bands for the front, hem and cuffs.  There are so many possibilities for the edges, but because of the curves, many of them will be difficult.

I still need to verify the garment length, and work on the collar and curvature of the back seams.  The length of the garment, when adjusted to my body size, does not seem as proportional as the flat drawings of the pattern on the Vogue web site.

I am thinking of printing the pattern out once I have completed my refinements, and making a "muslin" from commercial fabric before I invest time in knitting it.   Marcy indicates that her pattern is suitable for either wovens or knits, and I have lots and lots of fabric in my stash. It wouldn't cost me anything except time!   I never seem to have time for sewing any more!

But, before I start working on this again, I still need to prepare for the class this Saturday, cleaning up and packing up the machines I am taking, doing a final proofreading of the handouts, and printing them off.

Saturday, May 5, 2018

AYAB and Penguicon

There is nothing like a deadline to get you moving.  Especially one where it is public if you miss it.    I've just completed my #Penguicon presentation.  I am happy to report that it seemed to be well-received by most attendees.

I had two sessions:  The first was a background/prerequisite course "Introduction to machine knitting" where I discussed the history of knitting and machine knitting, the technology,  and the  types of fabrics that can be produced.  I passed around acrylic, wool and wool/rayon swatches that exemplified the types of stitches that can be produced on a knitting machine.  Tuck, fairisle, slip stitch (mosaic) and showed slides of various types of patterning mechanisms, internal and external storage on the machines.

The second  session was a discussion of the AYAB knitting machine hack for KH-910, KH-930, and KH-940 model machines.  I demonstrated the AYAB software and spent a lot of time discussing the problems associated with creating a two-color input pixel-per-stitch input file.  I mentioned that Photoshop, GIMP, and Paint.net had been suggested as editing tools. I used Cochenille's Stitch Painter, Paint, and IMG2track as editors.   We created Word Art in Microsoft word and used the resulting image to knit a word "Penguicon"
I showed pieces I knit prior to the conference:


I showed the samples that I had created before the session: a random llama, a cute baby photo, and a cross-stitch design I copied from Pinterest.


There was a positive response to the punchcard designs that I showed, especially when I mentioned the usefulness of a knitting machine that does not require electricity in the event of a Zombie apocalypse. Side note: There was a car in the front of the hotel that was prepped for a Zombie apocalypse, unbeknownst to me.

I showed a design that I intend to re-knit, a Rowan design that I punched manually, and compared it to the punchcards I used to knit it.  Some of the attendees were taking pictures, I hope they hash tag with #Penguicon or #AYAB